Nothing is perfect in this world, and even Linux sometimes crashes. But even then there is a connection with kernel - Magic SysRq Key.
What is this?
If you look to the keyboard then you see a strange key PrtSc / SysRq. Most people thinks that such key is for taking screenshots, but SysRq appeared on keyboards many years before Redmond behemoth.
Using SysRq key it is possible to force a Linux system to sync disks, remount disks into "read-only" mode, and then reboot computer safely. The key combination is intercepted directly by kernel, hence it is guaranty that Alt+SysRq is workable almost in any situations.
How we can use it?
First, we need to ensure that Magic SysRq key is enabled in kernel config: CONFIG_MAGIC_SYSRQ value must be Y (in most distributions it is so). To use such key, press and hold Alt, then press SysRq, release it and press another key - meanings of most useful keys are listed below
Simultaneously pressed Alt + SysRq + 'H'elp - prints to output all key combinations;
loglevel'0'-'8' - can change verbosity of the output from 0 (only critical messages) to 8 (most verbose mode);
Links
Except kernel documentation you may be interested in reading this and this links.
Read more...
Monday, 31 March 2008
Magic SysRq Key


Saturday, 23 February 2008
ACPI and WiFi card Intel PROWireless on Asus M5200ae M5A
In this post tweaking wireless card Intel PROWireless 2200 is described. It is a little bit tricky to get such card to work on Asus M5200AE notebook. But using latest extras from acpi4asus project, my wifi card works perfectly.
Intel PRO/Wireless 2200
Because this adapter is made by Intel, no problems should appear during installation of the drivers. It is required to download the firmware from here, unpack it and copy to /usr/share/firmware
Also you must install the packages for wireless networking:aptitude install wireless-tools, kwifimanager, kwirelessmonitor-net kwirelessmonitor kwrapper
And also install packages for ACPI:aptitude install acpi-support acpid laptop-mode-tools
If all steps were performed correctly then during boot process should be such strings:ieee80211_crypt: registered algorithm 'NULL'
It seems to work, but there are suspicious string emphasized by red bold font. What is a "Kill Switch" and why you can not connect to wireless networks when it activated?
ieee80211: 802.11 data/management/control stack, 1.1.14
ieee80211: Copyright (C) 2004-2005 Intel Corporation
ipw2200: Intel(R) PRO/Wireless 2200/2915 Network Driver, 1.1.3dmprq
ipw2200: Copyright(c) 2003-2006 Intel Corporation
ACPI: PCI Interrupt 0000:01:05.0[A] -> GSI 18 (level, low) -> IRQ 17
ipw2200: Detected Intel PRO/Wireless 2200BG Network Connection
ipw2200: Radio Frequency Kill Switch is On:
Kill switch must be turned off for wireless networking to work.
ipw2200: Detected geography ZZM (11 802.11bg channels, 0 802.11a channels)
Radio frequency killer
There is a combination of keys that turns on and off a radio transmitter of the WIFI chip. Such combination is often mentioned as "Kill Switch", thus is you did not deactivated such kill switch then yours WiFi ciph is turned off and nothing can help you.
To test Kill Switch is on or off, you can type such command:# cat /sys/bus/pci/drivers/ipw2200/0000\:01\:05.0/rf_kill
According to the documentation we have:
2
rf_kill
read -
0 = RF kill not enabled (radio on)
1 = SW based RF kill active (radio off)
2 = HW based RF kill active (radio off)
3 = Both HW and SW RF kill active (radio off)
End of story: Kill Switch is on, Wifi's radio transmitter is turned off. It also can be checked by iwconfig:
eth3 radio off ESSID:"virens"
Mode:Ad-Hoc Frequency:2.412 GHz Cell: Not-Associated
Bit Rate:0 kb/s Tx-Power=off Sensitivity=8/0
Retry limit:7 RTS thr:off Fragment thr:off
Encryption key:off
Power Management:off
Link Quality:0 Signal level:0 Noise level:0
Rx invalid nwid:0 Rx invalid crypt:0 Rx invalid frag:0
Tx excessive retries:0 Invalid misc:0 Missed beacon:0
As usual, Kill Switch key combination on notebooks is Fn+F2 but on your notebook it may be different.
For the key combination to turn on you need to activate ACPI extras for your notebook. For Asus laptops it is Asus Extras. You need to obtain latest version of the asus_extras driver from SVN of the Acpi4Asus project.
For those who compiled the kernel by themselves, here are some guidelines:
Power management options (ACPI, APM) --->[*] Power Management support ---->
Next, turning on the support of a Radio Frequency Kill Switch
[*] ACPI Support:
< > ASUS/Medion Laptop Extras
Networking --->[*] Networking support -->
--- Wireless extensions
[ ] Enable debugging output
[ ] Enable full debugging output
--- IEEE 802.11 WEP encryption (802.1x)
[ ] Enable full debugging output
In the Networking section turn on:<*> RF switch subsystem support --->
It is certainly that you need the NAT for providing Internet connections from you laptop, thus you need to activate NAT and Masquerading:
<*> Input layer to RF switch connector
Networking --->[*] Networking support -->
Next thing to do is activation of the wireless card.
Networking options --->
[*] Network packet filtering framework (Netfilter) --->
Core Netfilter Configuration --->
<*> Netfilter netlink interface
...
<*> Netfilter connection tracking support
IP: Netfilter Configuration --->
<*> IPv4 connection tracking support (required for NAT)
[*] proc/sysctl compatibility with old connection tracking
<*> IP tables support (required for filtering/masq/NAT)
<*> IP range match support
<*> TOS match support
<*> recent match support
<*> ECN match support
<*> AH match support
<*> TTL match support
<*> Owner match support
<*> address type match support
<*> Packet filtering
<*> REJECT target support
<*> LOG target support
<*> ULOG target support
<*> Full NAT
<*> MASQUERADE target support
<*> REDIRECT target support
<*> NETMAP target support
<*> SAME target support
...
<*> Packet mangling
<*> TOS target support
<*> ECN target support
<*> TTL target support
Device Drivers ----> Network device support --->
[*] Network device support
.................
Wireless LAN --->
[*] Wireless LAN (IEEE 802.11)
[*] Enable promiscuous mode
--- Enable radiotap format 802.11 raw packet support
[*] Enable creation of a RF radiotap promiscuous interface
[*] Enable QoS support
[*] Enable full debugging output in IPW2200 module.
Enabling firmware load:
Device Drivers ---->
Generic Driver Options ---->
Hotplug firmware loading support
For the connection to be encrypted you need to turn on encryption support:
Cryptographic options ->
<*>ARC4 cipher algorithm
<*>Michael MIC keyed digest algorithm
<*>AES cipher algorithms (i586)
And also this one:
Library routines ->
<*>CRC32 functions
After all you need to turn on the LED's support for indication of a wireless status. In the Device Drivers section:
Device Drivers ---->LED devices --->
That's all; compile the kernel and reboot with it.
[*] LED Support
<*> LED Class Support
--- LED drivers
--- LED Triggers
Let's fire up!
It is practically all that needed for your wireless happiness. During the boot process our kernel must detect the wireless card and turn it on. Now press Fn+F2 and the WiFi LED must turn on. If it works then all is done correctly and WiFi now can be used. Let's check the state of Kill Switch:# cat /sys/bus/pci/drivers/ipw2200/0000\:01\:05.0/rf_kill
That's it, the radio is turned ON. Now type:
0# iwconfig
It works! The rest of the job is simple: just configure an ad-hoc network. For the network to be configured you need to edit /etc/network/interfaces like this:
lo no wireless extensions.
eth1 no wireless extensions.
Warning: Driver for device eth3 has been compiled with version 22
of Wireless Extension, while this program supports up to version 20.
Some things may be broken...
eth3 unassociated ESSID:"virens"
Mode:Ad-Hoc Frequency=2.412 GHz Cell: Not-Associated
Bit Rate:0 kb/s Tx-Power=20 dBm Sensitivity=8/0
Retry limit:7 RTS thr:off Fragment thr:off
Encryption key:off
Power Management:off
Link Quality:0 Signal level:0 Noise level:0
Rx invalid nwid:0 Rx invalid crypt:0 Rx invalid frag:0
Tx excessive retries:0 Invalid misc:0 Missed beacon:0
auto eth3
iface eth3 inet static
address 10.106.146.1
netmask 255.255.255.0
wireless-mode ad-hoc
wireless-channel 1
wireless-rate auto
wireless-essid virens
Now let's tweak network card:iwconfig eth3 mode Ad-Hoc channel 1 essid virens
That's all and you got simple ad-hoc network with identifier virens .
Read more...
Sunday, 10 February 2008
SSH for mere mortals
There are a lot of documents about the SSH, but in this post I want to tell about simple things. Let me explain some simple and obvious SSH tricks... This command starts the GIMP on the remote machine and returns command prompt to you. If you do not enter ampersand then command prompt of the current SSH shell locks and returns only after application's over.
How to install SSH in Debian
From the Etch's release, packages for the SSH client and server are separated. Hence let's install SSH using command:# aptitude install ssh
and wait a few moments for configuration of the packages.
or
# aptitude install openssh-server openssh-client
On a client side
Now we must edit the configuration files located in the /etc/ssh directory. A client-side config file is ssh-config and a server-side config file is sshd-config. On a client-side let's allow to receive X11Forward; or such purposes, changing:ForwardX11 yes
Now the client machine can start the graphical applications on a server. Now let's go to the admin of the far-far-away
ForwardX11Trusted yeskingdom server...
On a server-side
We need to edit config file (you have root password from the server, aren't you? :-)) in /etc/ssh/sshd-config and changing the keys to such ones:X11Forwarding yes
Here we allowed to start graphical applications remotely and redirect them in the client machine. Restart the SSH daemon:
X11DisplayOffset 10
X11UseLocalhost yessudo /etc/init.d/ssh restart
That's practically all.
If there is necessity to restrict access to the machine, one need to change config file /etc/ssh/sshd_config in such way: AllowUsers hacker@*
AllowUsers *@192.168.1.*
SSH in work
It's all done, now open console and type:$ ssh remoteusername@ip_address_remotemachine
For example, in my case I write: ssh beast@192.168.1.5
After that, the SSH daemon asks us: this IP address isn't recognized yet, can I trust them? Sure! :-) Next, type the password of remote system, and if the password is correct then you log in into shell of the remote machine. During password typing you see nothing; you have 3 attempts or connection lost.
So, the SSH system will greet us like this:penta4@penta4rce:~$ ssh beast@192.168.1.5
Now we control remote computer: don't entangle machines or you shut down the wrong one! :-)
Password:
Linux notebeast 2.6.15.7 #3 PREEMPT Sun Jul 2 12:51:07 MSD 2006 i686 GNU/Linux
The programs included with the Debian GNU/Linux system are free software;
the exact distribution terms for each program are described in the
individual files in /usr/share/doc/*/copyright.
Debian GNU/Linux comes with ABSOLUTELY NO WARRANTY, to the extent
permitted by applicable law.
Last login: Tue Oct 10 19:23:57 2006 from 192.168.1.1
beast@notebeast:~$
Remote using of the graphical applications
When you logged in, just type the name of the program with ampersand at the end of command:$ gimp&
Thus, started remotely application is redirected to your machine and works the same as it started on your machine. Of course, the remotely started application will use files on the remote filesystem.
Conclusion
It is clear that SSH can be useful to mere mortals and not only for gurus. More about SSH one can read in Goooogle or in this this or this inks.
Read more...
Saturday, 26 January 2008
Debian printing via CUPS
Task: to print documents via local printers in Linux.
Let's firing up the CUPS
The CUPS is Common UNIX Printing System. Before you install CUPS, you ought to look if you printer is supported, starting from here. If you printer is supported, install the next packages:
aptitude install cupsys gs-esp foomatic-bin foo2zjsIt is significant to install not only CUPS itself, but a programs used by him.
It is really common mistake when people installing only cupsys,package and forgetting to install foo2zjs when using Hewlett Packard printers. As a result, during the print process, errors like listed below appearing:
I [23/Aug/2005:14:41:46 +0400] Adding end banner page "none" to job 7.When all packages will be installed, you must add printers and start to print.
I [23/Aug/2005:14:41:46 +0400] Job 7 queued on 'HPDeskJet930C' by 'penta4'.
E [23/Aug/2005:14:41:46 +0400] Unable to convert file 0 to printable format for job 7!
I [23/Aug/2005:14:41:46 +0400] Hint: Do you have ESP Ghostscript installed?
I [23/Aug/2005:14:41:46 +0400] Hint: Try setting the LogLevel to "debug".
In press!
For new printer to add or to change settings of already installed printer, launching any browser and go to the address:
http://localhost:631After some time, settings page should appeare:
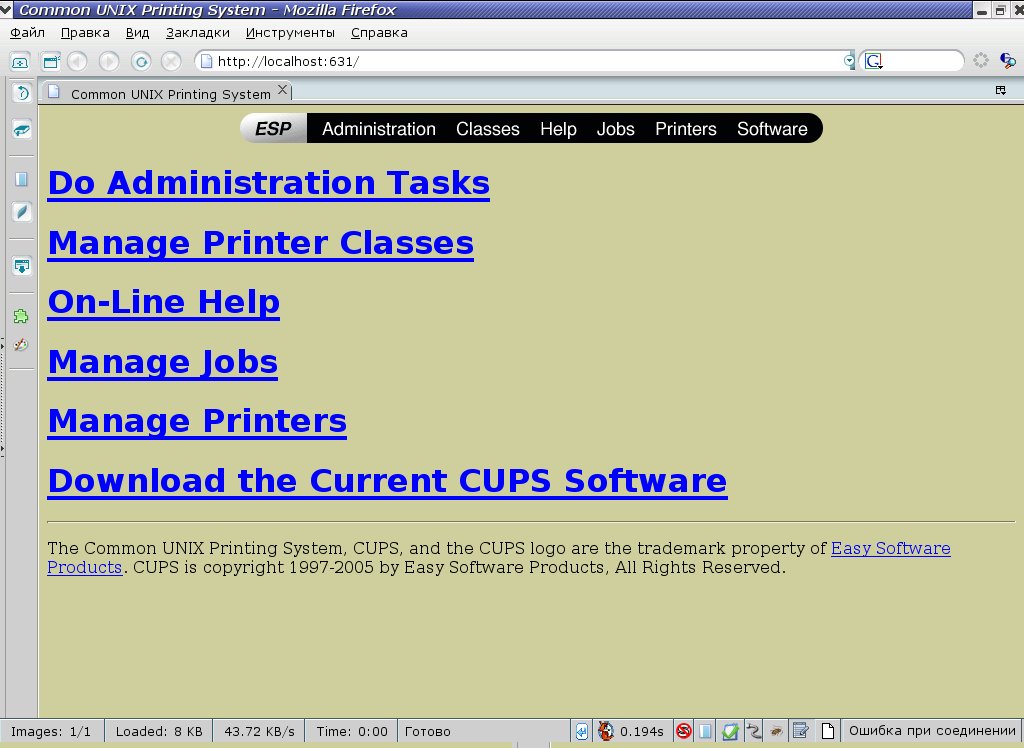
The CUPS page may loading in a long time if there is misconfigured DNS server in the local machine or in network. It is preferable to deactivate unnecessary network interface
ifconfig eth0 downPushing Printers menu item - if there are no printers, CUPS must confirm that. For new printer to add, a root privileges are required:

Next, writing printer's name with Latin font and without spaces. After that considering a printer's connection type (in my case, it's a USB printer):

Thus, choosing a printer from a list:
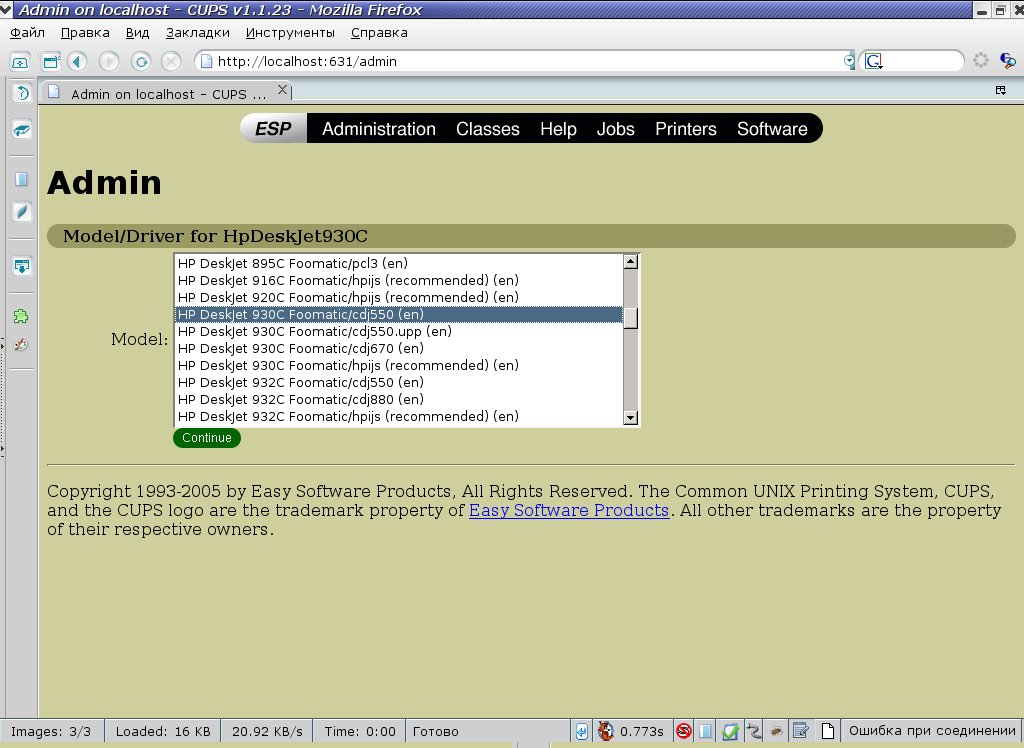
A few clicks after and all work is done. It is a good idea to enter in Printers menu and check if it appearing in list of ready-to-print devices.
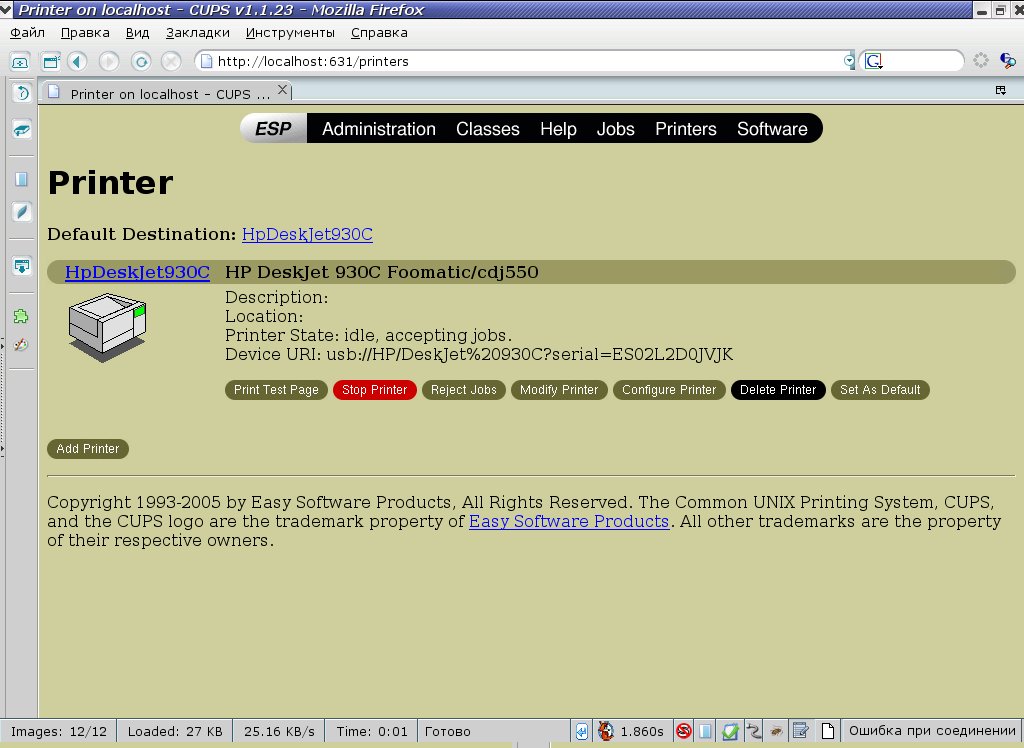
It can be easily configurable resolution, paper size and so on.
Printing from the GiMP
To print from GIMP, several additional packages are required:
aptitude install cupsys-driver-gimpprint gimp-printNow open the GIMP, any picture and select File - Print. After that, a big dialog box should appear, where all printer properties can be tweaked.
Here are some obstacles: gimp-print by default assuming you printer definitely postscript-compatible, what is sometimes wrong. To prevent incorrect printer output, printer must be selected directly:

That means to push Configure printer, selecting a model, approving and saving tweaks. Finally, all should work perfectly.
Read more...
Wednesday, 23 January 2008
Howto simply configure network card in Debian
Besides presence of eye-candy graphical configurators in Linux, in many situations it is more straightforward to change config files. It is really simple, and below it is shown how to do it.
How to see current network card settings
For brief review of network settings, it is enough to type in command prompt: # ifconfig
And something like this should appear:
or
sudo ifconfig
lo Link encap:Local Loopback
inet addr:127.0.0.1 Mask:255.0.0.0
UP LOOPBACK RUNNING MTU:16436 Metric:1
RX packets:104 errors:0 dropped:0 overruns:0 frame:0
TX packets:104 errors:0 dropped:0 overruns:0 carrier:0
collisions:0 txqueuelen:0
RX bytes:9387 (9.1 KiB) TX bytes:9387 (9.1 KiB)
eth0 Link encap:Ethernet HWaddr 00:0A:E4:53:AA:2D
inet addr:192.168.1.5 Bcast:192.168.1.255 Mask:255.255.255.0
UP BROADCAST MULTICAST MTU:1500 Metric:1
RX packets:0 errors:0 dropped:0 overruns:0 frame:0
TX packets:0 errors:0 dropped:0 overruns:0 carrier:0
collisions:0 txqueuelen:1000
RX bytes:0 (0.0 b) TX bytes:0 (0.0 b)
Interrupt:21 Base address:0x2c00
It is evident, that there are two interfaces had been configured: loopback named lo, and conventional Ethernet card eth0.
How to configure network connection in Linux
To do so, you need root privileges and _your_favorite_text_editor, as well as knowledge of which IP address you need to enter.
To find out which network interface need to be configured, type:dmesg | grep -i Eth
and next strings should appear:8139too Fast Ethernet driver 0.9.28
It looks like it is eth0 (because ethernet, 0 - zero device, pretty logical). Here and below it is assumed that interface is eth0
eth0: RealTek RTL8139 at 0xdf822c00, 00:15:f2:51:ad:da, IRQ 21
eth0: Identified 8139 chip type 'RTL-8101'
Configuring Linux network with static IP
Just edit the file:# nano /etc/network/interfaces
For your local network static IPs are surely enough. In particular, for static IP networking you need to enter: IP-address, netmask and gateway. Change /etc/network/interfaces to something like this:
or
sudo nano /etc/network/interfacesauto lo
In this example, IP-address 192.168.1.5 is set.
iface lo inet loopback
auto eth0
iface eth0 inet static
address 192.168.1.5
netmask 255.255.255.0
gateway 192.168.1.1
Configuring Linux network with dynamic IP addresses
Continue to edit network config:# nano /etc/network/interfaces
It is simpler here:
or
sudo nano /etc/network/interfacesauto lo
Similarly, network interface can be configured via command line:
iface lo inet loopback
auto eth0
iface eth0 inet dhcp#dhcpcd eth0
For this, you should install in Debian aptitude install dhcp3-client.
Configuring DNS nameserver in Linux
If you don't configure DNS, you cannot connect to any Internet resource by it's name. But it's very simple to tweak it: just edit or create file /etc/resolv.conf# nano /etc/resolv.conf
And type addresses like this:
or
sudo nano /etc/resolv.confnameserver 192.168.1.1
as much as it is need. The word nameserver is required. It is curious, but in fresh Debian installation there is no resolv.conf...
nameserver 192.168.2.1
For changes to take place immediately...
... one can reboot the system, or type:# /etc/init.d/networking restart
That's all, changes will be applied for all network interfaces.
or
sudo /etc/init.d/networking restart
Read more...
Saturday, 12 January 2008
Disk burning errors and some workarounds
Sometimes in a process of disk recording errors are happening. Such discs are often being threw away, but there are some tricks to finish the recording process. After that, disc is passing MD5 check and reads normally. Below are mentioned several tricks to do so.
Error during start or in the middle of recording
It is rarely happens, but at he beginning or in the middle of recording process growisofs suddenly broking precess and message appears:
Executing 'builtin_dd if=1.iso of=/dev/cdrom obs=32k seek=0'
/dev/cdrom: "Current Write Speed" is 16.4x1352KBps.
0/4393730048 ( 0.0%) @0x, remaining ??:?? RBU 100.0% UBU 0.0%
0/4393730048 ( 0.0%) @0x, remaining ??:?? RBU 100.0% UBU 0.0%
0/4393730048 ( 0.0%) @0x, remaining ??:?? RBU 100.0% UBU 0.0%
0/4393730048 ( 0.0%) @0x, remaining ??:?? RBU 100.0% UBU 0.0%
0/4393730048 ( 0.0%) @0x, remaining ??:?? RBU 100.0% UBU 0.0%
1671168/4393730048 ( 0.0%) @0.4x, remaining 1007:27 RBU 100.0% UBU 1.9%
:-[ WRITE@LBA=330h failed with SK=3h/ASC=0Ch/ACQ=00h]: Input/output error
:-( write failed: Input/output error
/dev/cdrom: flushing cache
/dev/cdrom: closing track
:-[ CLOSE TRACK failed with SK=3h/ASC=0Ch/ACQ=00h]: Input/output error
/dev/cdrom: closing session
/dev/cdrom: reloading tray
All that you need is to start burning again: growisofs restarts the process of recording from the last informational sector and will have record disc completely. After that, disc can be read without any problems and it passes MD5 check.
Close session error
Disk had been fully recorded, but I/O error appears while closing the session:
2144544*2KB out @ average 9.9x1352KBps
/dev/cdrom: flushing cache
/dev/cdrom: closing track
/dev/cdrom: closing session
:-[ CLOSE SESSION failed with SK=5h/ASC=72h/ACQ=03h]: Input/output error
It is pity, that disc had been burned completely but session isn't closed. Such disc is unreadable. But that can be corrected using simple trick from authors of dvd+rw-tools: here is a little program close, and here is the source code. Downloading it from here, installing sources of dvd+rw-tools and copying close.cpp in the directory with dvd+rw-tools sources. After that, let's compile close.cpp :g++ -o close close.cpp
Don't forget to give it appropriate permissions, and insert disc with unclosed session in the drive. Close session by command:close /dev/hda
If you DVD-recorder have different device file than /dev/hda please correct it.
Read more...
Sunday, 6 January 2008
TV Tuner Beholder BeholdTV 409FM in Linux
For TV Tuner to work in Linux properly, several steps should be performed. Described steps below are suitable for other devices of such type: for example, webcams. Only kernel modules parameters will be different.
Tweaking TV Tuner in Debian Linux
If you are using default distribution kernel, this section is certain can skipped. Type in terminal dmesg and there should appear something like that::saa7130/34: v4l2 driver version 0.2.14 loaded
You can receive different diagnostic messages, but principle is the same:
ACPI: PCI Interrupt 0000:06:02.0[A] -> GSI 18 (level, low) -> IRQ 18
saa7133[0]: found at 0000:06:02.0, rev: 240, irq: 18, latency: 32, mmio: 0xdfeff800
saa7133[0]: subsystem: 0000:4091, board: Beholder BeholdTV 409 FM [card=67,autodetected]
saa7133[0]: board init: gpio is c0c000
input: saa7134 IR (Beholder BeholdTV 4 as /class/input/input3
saa7133[0]: i2c eeprom 00: 00 00 91 40 54 20 00 00 00 00 00 00 00 00 00 01
saa7133[0]: i2c eeprom 10: ff ff ff ff ff ff ff ff ff ff ff ff ff ff ff ff
saa7133[0]: i2c eeprom 20: ff ff ff ff ff ff ff ff ff ff ff ff ff ff ff ff
saa7133[0]: i2c eeprom 30: ff ff ff ff ff ff ff ff ff ff ff ff ff ff ff ff
saa7133[0]: i2c eeprom 40: ff ff ff ff ff ff ff ff ff ff ff ff ff ff ff ff
saa7133[0]: i2c eeprom 50: ff ff ff ff ff ff ff ff ff ff ff ff ff ff ff ff
saa7133[0]: i2c eeprom 60: ff ff ff ff ff ff ff ff ff ff ff ff ff ff ff ff
saa7133[0]: i2c eeprom 70: ff ff ff ff ff ff ff ff ff ff ff ff ff ff ff ff
tuner 1-0060: All bytes are equal. It is not a TEA5767
tuner 1-0060: chip found @ 0xc0 (saa7133[0])
tuner 1-0060: type set to 38 (Philips PAL/SECAM multi (FM1216ME MK3))
tda9887 1-0043: chip found @ 0x86 (saa7133[0])
saa7133[0]: registered device video0 [v4l2]
saa7133[0]: registered device vbi0
saa7133[0]: registered device radio0
- Driver name - saa7133
- Tuner name - Beholder BeholdTV 409 FM and card number card=67
- Driver number for tuner 1-0060: type set to 38 (Philips PAL/SECAM multi (FM1216ME MK3))
rmmod saa7134Greyed line is suitable only for countries with SECAM TV standard (for example, Russia).
modprobe saa7134 tuner=63 card=67
rmmod tda9887
modprobe tda9887 secam=d
chmod 777 /dev/video0
This example covers Behold 409FM and kernel version below 2.6.18. For newer kernels (version > 2.6.18), one should use that parameters:
rmmod saa7134
modprobe saa7134 tuner=63 card=67
rmmod tuner
modprobe tuner secam=d
chmod 777 /dev/video0
Please pay attention that in /dev/ should appear new device file video0 - here is our tuner, and this device file will be used by programs. Often many problems arise with incorrect (mostly, insufficient) permissions to /dev/video0. Thus, give maximum permissions to file:
sudo chmod 777 /dev/video0
If you have a customized linux kernel
In customized kernel, an I2C and Video4Linux support must be activated and a driver for TV Tuner chip as well. It is notable that one kernel module supports a couple of tuners!
Hence, let's compile i2c and Video4Linux monolithically, and I2C drivers and tuner driver as modules. If you are uncertain of which driver is necessary, use
lspciMoreover, in Documentation section of kernel sources, video4linux subsection, practically all driver parameters are described.
If TV Tuner does not work under Linux...
Consult with current kernel documentation - there should be answer of which tuners are supported. Consider to upgrade your kernel to fresh one. On the off-chance, documentation on kernel is located here: /usr/src/linux-2.6.zz.z/Documentation/video4linux where zz.z is your exact kernel version.
Inside this directory, should be several files like CARDLIST.yyy, where yyy - driver name. Open this files and search you tuner name. If you can't find your tuner there, upgrade the kernel.
If you are lucky, you can find even a card number - for my Beholder409 it is:
./video4linux/CARDLIST.saa7134This is exact card number, just substitute it in command modprobe saa7134 tuner=63 card=67
...
67 -> Beholder BeholdTV 409 FM [0000:4091]
...
The same situation appears with CARDLIST.tuner - it must be only one, but this file contents tuners number. In dmesg output you should see:
tuner 1-0043: chip found @ 0x86 (saa7133[0])Hence, 38 is my tuner number (again, for Beholder409). The same number is in file:
tda9887 1-0043: tda988[5/6/7] found @ 0x43 (tuner)
tuner 1-0060: All bytes are equal. It is not a TEA5767
tuner 1-0060: chip found @ 0xc0 (saa7133[0])
tuner 1-0060: type set to 38 (Philips PAL/SECAM multi (FM1216ME MK3))
tuner=38 - Philips PAL/SECAM multi (FM1216ME MK3)
Searching TV channels
I hope that your tuner is detected, so the only thing remaining is to install software:
aptitude install tvtimeThis is one of the coolest program for TV Tuners that stood out from the rest of programs (tvtime, xawtv, zapper). After installation of tvtime, let's search channels:
tvtime-scannerwhich starting to scan all frequencies and search TV channels:
Reading configuration from /etc/tvtime/tvtime.xmlAfter that, run tvtime and rearrange found channels to your own taste.
Reading configuration from /home/penta4/.tvtime/tvtime.xml
Scanning using TV standard SECAM.
Scanning from 44,00 MHz to 958,00 MHz.
Found a channel at 59,50 MHz (58,25 - 60,50 MHz), adding to channel list.
Found a channel at 63,00 MHz (62,75 - 63,00 MHz), adding to channel list.
Found a channel at 77,50 MHz (77,25 - 77,50 MHz), adding to channel list.
Found a channel at 79,75 MHz (79,50 - 79,75 MHz), adding to channel list.
Found a channel at 85,50 MHz (84,25 - 86,50 MHz), adding to channel list.
Found a channel at 111,50 MHz (110,25 - 112,50 MHz), adding to channel list.
Take a note that computer TV Tuners (especially internal) are known to provide worse picture quality and less channels than conventional TV. This is caused by strong electromagnetic noise and cross-talks inside computer.As a result, in your home directory should appear hidden directory .tvtime where all TV tweaks are placed.
Read more...


