There were a lot of words were told about defragmentation of Linux filesystems. Summing them up, one can say: if fsck tells that fragmentation is below 10% then defrag is not necessary. But a few defragmentators for Linux were written. So let's discuss them.
Search results
A brief look at defragmentation tools for Linux is enough to find two utilites, a defrag and a shake. The defrag utility by Cone Colivas seems to be outdated. But there is a shake that can defragment a selected directory in a file system. There is also a useful script frag.perl located here that can measure fragmentation level of directories:
Using these tools, shake and frag.perl, we are going to fight with filesystem's fragmentation in Linux.sudo ./frag.pl /root
3.2258064516129% non contiguous files, 1.04838709677419 average fragments.
Setting it up
The setup of shake is slightly complicated process. The sources are located here, and if you are using Ubuntu you can take the binary file here. And here I had experienced some difficulties...
Firstly, latest versions of shake depends from fresh version of cdbs; that is why it is better to use older version. For the shake to be built, following packages are reqiured:dpkg-checkbuilddeps: Unmet build dependencies: cdbs (>= 0.4.50) cmake (>= 2.4) help2man (>= 1.26) libattr1-dev (>= 2.0.0)
The program had compiled as well as her auxiliary tool unattr. For using shake more efficiently you might to mount a filesystem with user_xattr. To do such you need to edit /etc/fstab such like:/dev/sda2 /mnt/flash/exthdd ext3 rw,user_xattr,user,auto 0 0
Then rmount: mount -o remount /dev/sda2
This trick allows the shake to works faster. And the last but not least, both shake и frag.perl are required root privileges so use sudo.
An example
I had tested shake on Hardy Heron repository that I downloaded. Checking fragmentation level gives:./frag.perl /home/beast/flash/exthdd/linux/i386/ubuntu/pool/main 0.795800880460549% non contiguous files, 1.00998984083982 average fragments.
That is not a Windows situationan apocalypse. Then I had started shake:./shake /home/beast/flash/exthdd/linux/i386/ubuntu/pool/main
The defragmentation took about 15-20 and all MD5SUMs are correct. So we can use shake for more extended experiments.
The extended experiment
For such experiment I had used to defragment Firefox's profile on my laptop: Firefox 2.0.0.4, ReiserFS, Asus M5200AE (P-M 1.75, 512Mb RAM).
There are a lot of files, and even worse: in Firefox profile there is a huge collection of webpages captured by Scrapbook. Estimated fragmentation is:./frag.perl /home/beast/.mozilla/
I should say that my Firefox is covered with extensions like a Christmas tree, so it starts very sloooooooowly:
3.24491439557299% non contiguous files, 1.12239224753839 average fragments.time /opt/firefox2/firefox
Firefox had been started two times with laptop clod-start each time.
real 0m40.467s
user 0m5.389s
sys 0m0.407s
time /opt/firefox2/firefox
real 0m41.383s
user 0m5.453s
sys 0m0.403s
Then defragmentation had been performed by shake. It took about 9 minutes. After that I started Firefox again:time /opt/firefox2/firefox
There are no miracles, and 39 seconds are not fantastical results.
real 0m39.522s
user 0m5.398s
sys 0m0.374s
time /opt/firefox2/firefox
real 0m39.214s
user 0m5.279s
sys 0m0.370s
Conclusion
Sure, I can defrag something else but it is unlikely that results will be different. The analogous results are here and there.
Read more...
Saturday, 31 May 2008
Defragmenters for Linux
![]()
![]()
![]()
![]()
![]()
![]()
![]()
Monday, 31 March 2008
Magic SysRq Key
Nothing is perfect in this world, and even Linux sometimes crashes. But even then there is a connection with kernel - Magic SysRq Key.
What is this?
If you look to the keyboard then you see a strange key PrtSc / SysRq. Most people thinks that such key is for taking screenshots, but SysRq appeared on keyboards many years before Redmond behemoth.
Using SysRq key it is possible to force a Linux system to sync disks, remount disks into "read-only" mode, and then reboot computer safely. The key combination is intercepted directly by kernel, hence it is guaranty that Alt+SysRq is workable almost in any situations.
How we can use it?
First, we need to ensure that Magic SysRq key is enabled in kernel config: CONFIG_MAGIC_SYSRQ value must be Y (in most distributions it is so). To use such key, press and hold Alt, then press SysRq, release it and press another key - meanings of most useful keys are listed below
Simultaneously pressed Alt + SysRq + 'H'elp - prints to output all key combinations;
loglevel'0'-'8' - can change verbosity of the output from 0 (only critical messages) to 8 (most verbose mode);
Links
Except kernel documentation you may be interested in reading this and this links.
Read more...
![]()
![]()
![]()
![]()
![]()
![]()
![]()
Saturday, 23 February 2008
ACPI and WiFi card Intel PROWireless on Asus M5200ae M5A
In this post tweaking wireless card Intel PROWireless 2200 is described. It is a little bit tricky to get such card to work on Asus M5200AE notebook. But using latest extras from acpi4asus project, my wifi card works perfectly.
Intel PRO/Wireless 2200
Because this adapter is made by Intel, no problems should appear during installation of the drivers. It is required to download the firmware from here, unpack it and copy to /usr/share/firmware
Also you must install the packages for wireless networking:aptitude install wireless-tools, kwifimanager, kwirelessmonitor-net kwirelessmonitor kwrapper
And also install packages for ACPI:aptitude install acpi-support acpid laptop-mode-tools
If all steps were performed correctly then during boot process should be such strings:ieee80211_crypt: registered algorithm 'NULL'
It seems to work, but there are suspicious string emphasized by red bold font. What is a "Kill Switch" and why you can not connect to wireless networks when it activated?
ieee80211: 802.11 data/management/control stack, 1.1.14
ieee80211: Copyright (C) 2004-2005 Intel Corporation
ipw2200: Intel(R) PRO/Wireless 2200/2915 Network Driver, 1.1.3dmprq
ipw2200: Copyright(c) 2003-2006 Intel Corporation
ACPI: PCI Interrupt 0000:01:05.0[A] -> GSI 18 (level, low) -> IRQ 17
ipw2200: Detected Intel PRO/Wireless 2200BG Network Connection
ipw2200: Radio Frequency Kill Switch is On:
Kill switch must be turned off for wireless networking to work.
ipw2200: Detected geography ZZM (11 802.11bg channels, 0 802.11a channels)
Radio frequency killer
There is a combination of keys that turns on and off a radio transmitter of the WIFI chip. Such combination is often mentioned as "Kill Switch", thus is you did not deactivated such kill switch then yours WiFi ciph is turned off and nothing can help you.
To test Kill Switch is on or off, you can type such command:# cat /sys/bus/pci/drivers/ipw2200/0000\:01\:05.0/rf_kill
According to the documentation we have:
2
rf_kill
read -
0 = RF kill not enabled (radio on)
1 = SW based RF kill active (radio off)
2 = HW based RF kill active (radio off)
3 = Both HW and SW RF kill active (radio off)
End of story: Kill Switch is on, Wifi's radio transmitter is turned off. It also can be checked by iwconfig:
eth3 radio off ESSID:"virens"
Mode:Ad-Hoc Frequency:2.412 GHz Cell: Not-Associated
Bit Rate:0 kb/s Tx-Power=off Sensitivity=8/0
Retry limit:7 RTS thr:off Fragment thr:off
Encryption key:off
Power Management:off
Link Quality:0 Signal level:0 Noise level:0
Rx invalid nwid:0 Rx invalid crypt:0 Rx invalid frag:0
Tx excessive retries:0 Invalid misc:0 Missed beacon:0
As usual, Kill Switch key combination on notebooks is Fn+F2 but on your notebook it may be different.
For the key combination to turn on you need to activate ACPI extras for your notebook. For Asus laptops it is Asus Extras. You need to obtain latest version of the asus_extras driver from SVN of the Acpi4Asus project.
For those who compiled the kernel by themselves, here are some guidelines:
Power management options (ACPI, APM) --->[*] Power Management support ---->
Next, turning on the support of a Radio Frequency Kill Switch
[*] ACPI Support:
< > ASUS/Medion Laptop Extras
Networking --->[*] Networking support -->
--- Wireless extensions
[ ] Enable debugging output
[ ] Enable full debugging output
--- IEEE 802.11 WEP encryption (802.1x)
[ ] Enable full debugging output
In the Networking section turn on:<*> RF switch subsystem support --->
It is certainly that you need the NAT for providing Internet connections from you laptop, thus you need to activate NAT and Masquerading:
<*> Input layer to RF switch connector
Networking --->[*] Networking support -->
Next thing to do is activation of the wireless card.
Networking options --->
[*] Network packet filtering framework (Netfilter) --->
Core Netfilter Configuration --->
<*> Netfilter netlink interface
...
<*> Netfilter connection tracking support
IP: Netfilter Configuration --->
<*> IPv4 connection tracking support (required for NAT)
[*] proc/sysctl compatibility with old connection tracking
<*> IP tables support (required for filtering/masq/NAT)
<*> IP range match support
<*> TOS match support
<*> recent match support
<*> ECN match support
<*> AH match support
<*> TTL match support
<*> Owner match support
<*> address type match support
<*> Packet filtering
<*> REJECT target support
<*> LOG target support
<*> ULOG target support
<*> Full NAT
<*> MASQUERADE target support
<*> REDIRECT target support
<*> NETMAP target support
<*> SAME target support
...
<*> Packet mangling
<*> TOS target support
<*> ECN target support
<*> TTL target support
Device Drivers ----> Network device support --->
[*] Network device support
.................
Wireless LAN --->
[*] Wireless LAN (IEEE 802.11)
[*] Enable promiscuous mode
--- Enable radiotap format 802.11 raw packet support
[*] Enable creation of a RF radiotap promiscuous interface
[*] Enable QoS support
[*] Enable full debugging output in IPW2200 module.
Enabling firmware load:
Device Drivers ---->
Generic Driver Options ---->
Hotplug firmware loading support
For the connection to be encrypted you need to turn on encryption support:
Cryptographic options ->
<*>ARC4 cipher algorithm
<*>Michael MIC keyed digest algorithm
<*>AES cipher algorithms (i586)
And also this one:
Library routines ->
<*>CRC32 functions
After all you need to turn on the LED's support for indication of a wireless status. In the Device Drivers section:
Device Drivers ---->LED devices --->
That's all; compile the kernel and reboot with it.
[*] LED Support
<*> LED Class Support
--- LED drivers
--- LED Triggers
Let's fire up!
It is practically all that needed for your wireless happiness. During the boot process our kernel must detect the wireless card and turn it on. Now press Fn+F2 and the WiFi LED must turn on. If it works then all is done correctly and WiFi now can be used. Let's check the state of Kill Switch:# cat /sys/bus/pci/drivers/ipw2200/0000\:01\:05.0/rf_kill
That's it, the radio is turned ON. Now type:
0# iwconfig
It works! The rest of the job is simple: just configure an ad-hoc network. For the network to be configured you need to edit /etc/network/interfaces like this:
lo no wireless extensions.
eth1 no wireless extensions.
Warning: Driver for device eth3 has been compiled with version 22
of Wireless Extension, while this program supports up to version 20.
Some things may be broken...
eth3 unassociated ESSID:"virens"
Mode:Ad-Hoc Frequency=2.412 GHz Cell: Not-Associated
Bit Rate:0 kb/s Tx-Power=20 dBm Sensitivity=8/0
Retry limit:7 RTS thr:off Fragment thr:off
Encryption key:off
Power Management:off
Link Quality:0 Signal level:0 Noise level:0
Rx invalid nwid:0 Rx invalid crypt:0 Rx invalid frag:0
Tx excessive retries:0 Invalid misc:0 Missed beacon:0
auto eth3
iface eth3 inet static
address 10.106.146.1
netmask 255.255.255.0
wireless-mode ad-hoc
wireless-channel 1
wireless-rate auto
wireless-essid virens
Now let's tweak network card:iwconfig eth3 mode Ad-Hoc channel 1 essid virens
That's all and you got simple ad-hoc network with identifier virens .
Read more...
![]()
![]()
![]()
![]()
![]()
![]()
![]()
Sunday, 10 February 2008
SSH for mere mortals
There are a lot of documents about the SSH, but in this post I want to tell about simple things. Let me explain some simple and obvious SSH tricks... This command starts the GIMP on the remote machine and returns command prompt to you. If you do not enter ampersand then command prompt of the current SSH shell locks and returns only after application's over.
How to install SSH in Debian
From the Etch's release, packages for the SSH client and server are separated. Hence let's install SSH using command:# aptitude install ssh
and wait a few moments for configuration of the packages.
or
# aptitude install openssh-server openssh-client
On a client side
Now we must edit the configuration files located in the /etc/ssh directory. A client-side config file is ssh-config and a server-side config file is sshd-config. On a client-side let's allow to receive X11Forward; or such purposes, changing:ForwardX11 yes
Now the client machine can start the graphical applications on a server. Now let's go to the admin of the far-far-away
ForwardX11Trusted yeskingdom server...
On a server-side
We need to edit config file (you have root password from the server, aren't you? :-)) in /etc/ssh/sshd-config and changing the keys to such ones:X11Forwarding yes
Here we allowed to start graphical applications remotely and redirect them in the client machine. Restart the SSH daemon:
X11DisplayOffset 10
X11UseLocalhost yessudo /etc/init.d/ssh restart
That's practically all.
If there is necessity to restrict access to the machine, one need to change config file /etc/ssh/sshd_config in such way: AllowUsers hacker@*
AllowUsers *@192.168.1.*
SSH in work
It's all done, now open console and type:$ ssh remoteusername@ip_address_remotemachine
For example, in my case I write: ssh beast@192.168.1.5
After that, the SSH daemon asks us: this IP address isn't recognized yet, can I trust them? Sure! :-) Next, type the password of remote system, and if the password is correct then you log in into shell of the remote machine. During password typing you see nothing; you have 3 attempts or connection lost.
So, the SSH system will greet us like this:penta4@penta4rce:~$ ssh beast@192.168.1.5
Now we control remote computer: don't entangle machines or you shut down the wrong one! :-)
Password:
Linux notebeast 2.6.15.7 #3 PREEMPT Sun Jul 2 12:51:07 MSD 2006 i686 GNU/Linux
The programs included with the Debian GNU/Linux system are free software;
the exact distribution terms for each program are described in the
individual files in /usr/share/doc/*/copyright.
Debian GNU/Linux comes with ABSOLUTELY NO WARRANTY, to the extent
permitted by applicable law.
Last login: Tue Oct 10 19:23:57 2006 from 192.168.1.1
beast@notebeast:~$
Remote using of the graphical applications
When you logged in, just type the name of the program with ampersand at the end of command:$ gimp&
Thus, started remotely application is redirected to your machine and works the same as it started on your machine. Of course, the remotely started application will use files on the remote filesystem.
Conclusion
It is clear that SSH can be useful to mere mortals and not only for gurus. More about SSH one can read in Goooogle or in this this or this inks.
Read more...
![]()
![]()
![]()
![]()
![]()
![]()
![]()
Saturday, 26 January 2008
Debian printing via CUPS
Task: to print documents via local printers in Linux.
Let's firing up the CUPS
The CUPS is Common UNIX Printing System. Before you install CUPS, you ought to look if you printer is supported, starting from here. If you printer is supported, install the next packages:
aptitude install cupsys gs-esp foomatic-bin foo2zjsIt is significant to install not only CUPS itself, but a programs used by him.
It is really common mistake when people installing only cupsys,package and forgetting to install foo2zjs when using Hewlett Packard printers. As a result, during the print process, errors like listed below appearing:
I [23/Aug/2005:14:41:46 +0400] Adding end banner page "none" to job 7.When all packages will be installed, you must add printers and start to print.
I [23/Aug/2005:14:41:46 +0400] Job 7 queued on 'HPDeskJet930C' by 'penta4'.
E [23/Aug/2005:14:41:46 +0400] Unable to convert file 0 to printable format for job 7!
I [23/Aug/2005:14:41:46 +0400] Hint: Do you have ESP Ghostscript installed?
I [23/Aug/2005:14:41:46 +0400] Hint: Try setting the LogLevel to "debug".
In press!
For new printer to add or to change settings of already installed printer, launching any browser and go to the address:
http://localhost:631After some time, settings page should appeare:

The CUPS page may loading in a long time if there is misconfigured DNS server in the local machine or in network. It is preferable to deactivate unnecessary network interface
ifconfig eth0 downPushing Printers menu item - if there are no printers, CUPS must confirm that. For new printer to add, a root privileges are required:

Next, writing printer's name with Latin font and without spaces. After that considering a printer's connection type (in my case, it's a USB printer):

Thus, choosing a printer from a list:
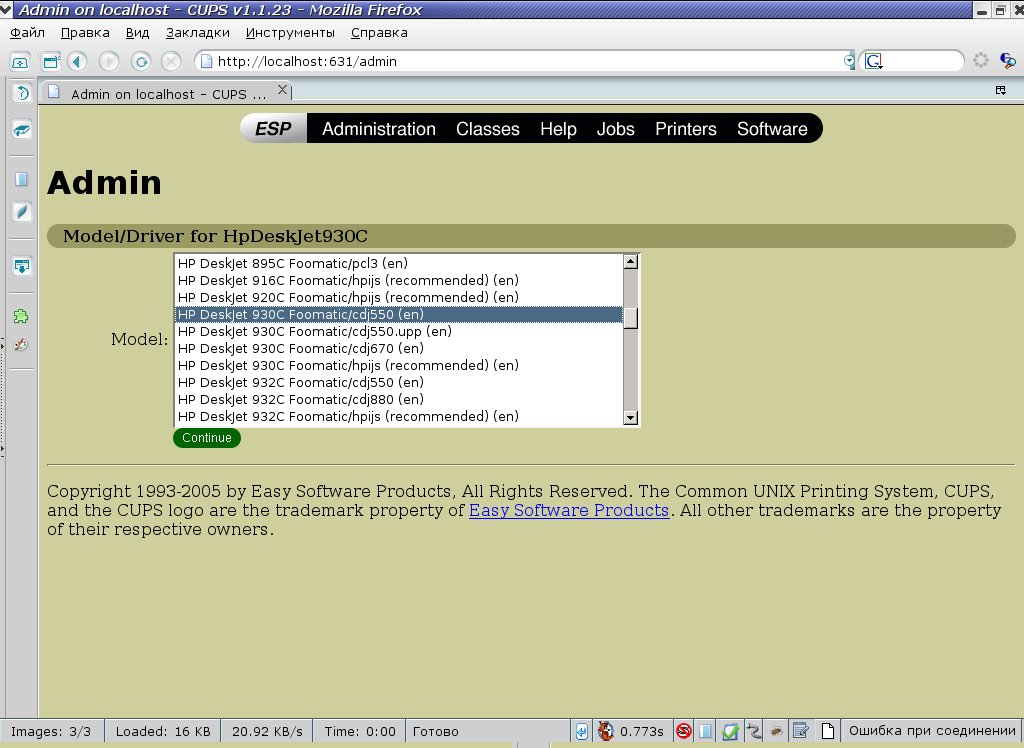
A few clicks after and all work is done. It is a good idea to enter in Printers menu and check if it appearing in list of ready-to-print devices.
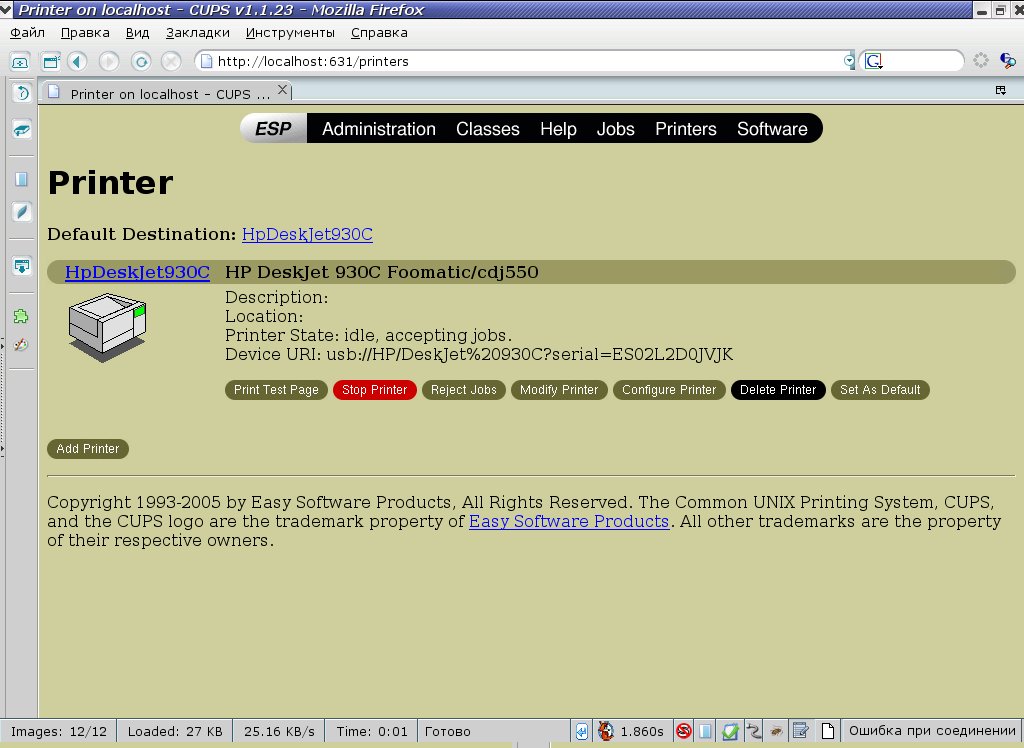
It can be easily configurable resolution, paper size and so on.
Printing from the GiMP
To print from GIMP, several additional packages are required:
aptitude install cupsys-driver-gimpprint gimp-printNow open the GIMP, any picture and select File - Print. After that, a big dialog box should appear, where all printer properties can be tweaked.
Here are some obstacles: gimp-print by default assuming you printer definitely postscript-compatible, what is sometimes wrong. To prevent incorrect printer output, printer must be selected directly:

That means to push Configure printer, selecting a model, approving and saving tweaks. Finally, all should work perfectly.
Read more...
![]()
![]()
![]()
![]()
![]()
![]()
![]()
Wednesday, 23 January 2008
Howto simply configure network card in Debian
Besides presence of eye-candy graphical configurators in Linux, in many situations it is more straightforward to change config files. It is really simple, and below it is shown how to do it.
How to see current network card settings
For brief review of network settings, it is enough to type in command prompt: # ifconfig
And something like this should appear:
or
sudo ifconfig
lo Link encap:Local Loopback
inet addr:127.0.0.1 Mask:255.0.0.0
UP LOOPBACK RUNNING MTU:16436 Metric:1
RX packets:104 errors:0 dropped:0 overruns:0 frame:0
TX packets:104 errors:0 dropped:0 overruns:0 carrier:0
collisions:0 txqueuelen:0
RX bytes:9387 (9.1 KiB) TX bytes:9387 (9.1 KiB)
eth0 Link encap:Ethernet HWaddr 00:0A:E4:53:AA:2D
inet addr:192.168.1.5 Bcast:192.168.1.255 Mask:255.255.255.0
UP BROADCAST MULTICAST MTU:1500 Metric:1
RX packets:0 errors:0 dropped:0 overruns:0 frame:0
TX packets:0 errors:0 dropped:0 overruns:0 carrier:0
collisions:0 txqueuelen:1000
RX bytes:0 (0.0 b) TX bytes:0 (0.0 b)
Interrupt:21 Base address:0x2c00
It is evident, that there are two interfaces had been configured: loopback named lo, and conventional Ethernet card eth0.
How to configure network connection in Linux
To do so, you need root privileges and _your_favorite_text_editor, as well as knowledge of which IP address you need to enter.
To find out which network interface need to be configured, type:dmesg | grep -i Eth
and next strings should appear:8139too Fast Ethernet driver 0.9.28
It looks like it is eth0 (because ethernet, 0 - zero device, pretty logical). Here and below it is assumed that interface is eth0
eth0: RealTek RTL8139 at 0xdf822c00, 00:15:f2:51:ad:da, IRQ 21
eth0: Identified 8139 chip type 'RTL-8101'
Configuring Linux network with static IP
Just edit the file:# nano /etc/network/interfaces
For your local network static IPs are surely enough. In particular, for static IP networking you need to enter: IP-address, netmask and gateway. Change /etc/network/interfaces to something like this:
or
sudo nano /etc/network/interfacesauto lo
In this example, IP-address 192.168.1.5 is set.
iface lo inet loopback
auto eth0
iface eth0 inet static
address 192.168.1.5
netmask 255.255.255.0
gateway 192.168.1.1
Configuring Linux network with dynamic IP addresses
Continue to edit network config:# nano /etc/network/interfaces
It is simpler here:
or
sudo nano /etc/network/interfacesauto lo
Similarly, network interface can be configured via command line:
iface lo inet loopback
auto eth0
iface eth0 inet dhcp#dhcpcd eth0
For this, you should install in Debian aptitude install dhcp3-client.
Configuring DNS nameserver in Linux
If you don't configure DNS, you cannot connect to any Internet resource by it's name. But it's very simple to tweak it: just edit or create file /etc/resolv.conf# nano /etc/resolv.conf
And type addresses like this:
or
sudo nano /etc/resolv.confnameserver 192.168.1.1
as much as it is need. The word nameserver is required. It is curious, but in fresh Debian installation there is no resolv.conf...
nameserver 192.168.2.1
For changes to take place immediately...
... one can reboot the system, or type:# /etc/init.d/networking restart
That's all, changes will be applied for all network interfaces.
or
sudo /etc/init.d/networking restart
Read more...
![]()
![]()
![]()
![]()
![]()
![]()
![]()
Saturday, 12 January 2008
Disk burning errors and some workarounds
Sometimes in a process of disk recording errors are happening. Such discs are often being threw away, but there are some tricks to finish the recording process. After that, disc is passing MD5 check and reads normally. Below are mentioned several tricks to do so.
Error during start or in the middle of recording
It is rarely happens, but at he beginning or in the middle of recording process growisofs suddenly broking precess and message appears:
Executing 'builtin_dd if=1.iso of=/dev/cdrom obs=32k seek=0'
/dev/cdrom: "Current Write Speed" is 16.4x1352KBps.
0/4393730048 ( 0.0%) @0x, remaining ??:?? RBU 100.0% UBU 0.0%
0/4393730048 ( 0.0%) @0x, remaining ??:?? RBU 100.0% UBU 0.0%
0/4393730048 ( 0.0%) @0x, remaining ??:?? RBU 100.0% UBU 0.0%
0/4393730048 ( 0.0%) @0x, remaining ??:?? RBU 100.0% UBU 0.0%
0/4393730048 ( 0.0%) @0x, remaining ??:?? RBU 100.0% UBU 0.0%
1671168/4393730048 ( 0.0%) @0.4x, remaining 1007:27 RBU 100.0% UBU 1.9%
:-[ WRITE@LBA=330h failed with SK=3h/ASC=0Ch/ACQ=00h]: Input/output error
:-( write failed: Input/output error
/dev/cdrom: flushing cache
/dev/cdrom: closing track
:-[ CLOSE TRACK failed with SK=3h/ASC=0Ch/ACQ=00h]: Input/output error
/dev/cdrom: closing session
/dev/cdrom: reloading tray
All that you need is to start burning again: growisofs restarts the process of recording from the last informational sector and will have record disc completely. After that, disc can be read without any problems and it passes MD5 check.
Close session error
Disk had been fully recorded, but I/O error appears while closing the session:
2144544*2KB out @ average 9.9x1352KBps
/dev/cdrom: flushing cache
/dev/cdrom: closing track
/dev/cdrom: closing session
:-[ CLOSE SESSION failed with SK=5h/ASC=72h/ACQ=03h]: Input/output error
It is pity, that disc had been burned completely but session isn't closed. Such disc is unreadable. But that can be corrected using simple trick from authors of dvd+rw-tools: here is a little program close, and here is the source code. Downloading it from here, installing sources of dvd+rw-tools and copying close.cpp in the directory with dvd+rw-tools sources. After that, let's compile close.cpp :g++ -o close close.cpp
Don't forget to give it appropriate permissions, and insert disc with unclosed session in the drive. Close session by command:close /dev/hda
If you DVD-recorder have different device file than /dev/hda please correct it.
Read more...
![]()
![]()
![]()
![]()
![]()
![]()
![]()
Sunday, 6 January 2008
TV Tuner Beholder BeholdTV 409FM in Linux
For TV Tuner to work in Linux properly, several steps should be performed. Described steps below are suitable for other devices of such type: for example, webcams. Only kernel modules parameters will be different.
Tweaking TV Tuner in Debian Linux
If you are using default distribution kernel, this section is certain can skipped. Type in terminal dmesg and there should appear something like that::saa7130/34: v4l2 driver version 0.2.14 loaded
You can receive different diagnostic messages, but principle is the same:
ACPI: PCI Interrupt 0000:06:02.0[A] -> GSI 18 (level, low) -> IRQ 18
saa7133[0]: found at 0000:06:02.0, rev: 240, irq: 18, latency: 32, mmio: 0xdfeff800
saa7133[0]: subsystem: 0000:4091, board: Beholder BeholdTV 409 FM [card=67,autodetected]
saa7133[0]: board init: gpio is c0c000
input: saa7134 IR (Beholder BeholdTV 4 as /class/input/input3
saa7133[0]: i2c eeprom 00: 00 00 91 40 54 20 00 00 00 00 00 00 00 00 00 01
saa7133[0]: i2c eeprom 10: ff ff ff ff ff ff ff ff ff ff ff ff ff ff ff ff
saa7133[0]: i2c eeprom 20: ff ff ff ff ff ff ff ff ff ff ff ff ff ff ff ff
saa7133[0]: i2c eeprom 30: ff ff ff ff ff ff ff ff ff ff ff ff ff ff ff ff
saa7133[0]: i2c eeprom 40: ff ff ff ff ff ff ff ff ff ff ff ff ff ff ff ff
saa7133[0]: i2c eeprom 50: ff ff ff ff ff ff ff ff ff ff ff ff ff ff ff ff
saa7133[0]: i2c eeprom 60: ff ff ff ff ff ff ff ff ff ff ff ff ff ff ff ff
saa7133[0]: i2c eeprom 70: ff ff ff ff ff ff ff ff ff ff ff ff ff ff ff ff
tuner 1-0060: All bytes are equal. It is not a TEA5767
tuner 1-0060: chip found @ 0xc0 (saa7133[0])
tuner 1-0060: type set to 38 (Philips PAL/SECAM multi (FM1216ME MK3))
tda9887 1-0043: chip found @ 0x86 (saa7133[0])
saa7133[0]: registered device video0 [v4l2]
saa7133[0]: registered device vbi0
saa7133[0]: registered device radio0
- Driver name - saa7133
- Tuner name - Beholder BeholdTV 409 FM and card number card=67
- Driver number for tuner 1-0060: type set to 38 (Philips PAL/SECAM multi (FM1216ME MK3))
rmmod saa7134Greyed line is suitable only for countries with SECAM TV standard (for example, Russia).
modprobe saa7134 tuner=63 card=67
rmmod tda9887
modprobe tda9887 secam=d
chmod 777 /dev/video0
This example covers Behold 409FM and kernel version below 2.6.18. For newer kernels (version > 2.6.18), one should use that parameters:
rmmod saa7134
modprobe saa7134 tuner=63 card=67
rmmod tuner
modprobe tuner secam=d
chmod 777 /dev/video0
Please pay attention that in /dev/ should appear new device file video0 - here is our tuner, and this device file will be used by programs. Often many problems arise with incorrect (mostly, insufficient) permissions to /dev/video0. Thus, give maximum permissions to file:
sudo chmod 777 /dev/video0
If you have a customized linux kernel
In customized kernel, an I2C and Video4Linux support must be activated and a driver for TV Tuner chip as well. It is notable that one kernel module supports a couple of tuners!
Hence, let's compile i2c and Video4Linux monolithically, and I2C drivers and tuner driver as modules. If you are uncertain of which driver is necessary, use
lspciMoreover, in Documentation section of kernel sources, video4linux subsection, practically all driver parameters are described.
If TV Tuner does not work under Linux...
Consult with current kernel documentation - there should be answer of which tuners are supported. Consider to upgrade your kernel to fresh one. On the off-chance, documentation on kernel is located here: /usr/src/linux-2.6.zz.z/Documentation/video4linux where zz.z is your exact kernel version.
Inside this directory, should be several files like CARDLIST.yyy, where yyy - driver name. Open this files and search you tuner name. If you can't find your tuner there, upgrade the kernel.
If you are lucky, you can find even a card number - for my Beholder409 it is:
./video4linux/CARDLIST.saa7134This is exact card number, just substitute it in command modprobe saa7134 tuner=63 card=67
...
67 -> Beholder BeholdTV 409 FM [0000:4091]
...
The same situation appears with CARDLIST.tuner - it must be only one, but this file contents tuners number. In dmesg output you should see:
tuner 1-0043: chip found @ 0x86 (saa7133[0])Hence, 38 is my tuner number (again, for Beholder409). The same number is in file:
tda9887 1-0043: tda988[5/6/7] found @ 0x43 (tuner)
tuner 1-0060: All bytes are equal. It is not a TEA5767
tuner 1-0060: chip found @ 0xc0 (saa7133[0])
tuner 1-0060: type set to 38 (Philips PAL/SECAM multi (FM1216ME MK3))
tuner=38 - Philips PAL/SECAM multi (FM1216ME MK3)
Searching TV channels
I hope that your tuner is detected, so the only thing remaining is to install software:
aptitude install tvtimeThis is one of the coolest program for TV Tuners that stood out from the rest of programs (tvtime, xawtv, zapper). After installation of tvtime, let's search channels:
tvtime-scannerwhich starting to scan all frequencies and search TV channels:
Reading configuration from /etc/tvtime/tvtime.xmlAfter that, run tvtime and rearrange found channels to your own taste.
Reading configuration from /home/penta4/.tvtime/tvtime.xml
Scanning using TV standard SECAM.
Scanning from 44,00 MHz to 958,00 MHz.
Found a channel at 59,50 MHz (58,25 - 60,50 MHz), adding to channel list.
Found a channel at 63,00 MHz (62,75 - 63,00 MHz), adding to channel list.
Found a channel at 77,50 MHz (77,25 - 77,50 MHz), adding to channel list.
Found a channel at 79,75 MHz (79,50 - 79,75 MHz), adding to channel list.
Found a channel at 85,50 MHz (84,25 - 86,50 MHz), adding to channel list.
Found a channel at 111,50 MHz (110,25 - 112,50 MHz), adding to channel list.
Take a note that computer TV Tuners (especially internal) are known to provide worse picture quality and less channels than conventional TV. This is caused by strong electromagnetic noise and cross-talks inside computer.As a result, in your home directory should appear hidden directory .tvtime where all TV tweaks are placed.
Read more...
![]()
![]()
![]()
![]()
![]()
![]()
![]()
Thursday, 27 December 2007
Bibliography in LaTex: JabRef
Problem: bibliographical list of cites in LaTeX being grown and became on the thither side of fifty sources. Sorting and storing of bibliographical list in scientific papers is evident.
Solve: there is cross platform system for bibliography base - JabRef.
During creation of vast scientific works, problems with bibliography in LaTeX frequently arises. In the base level of LaTeX study, users applies direct links to literature in the TEX-file:\addcontentsline{toc}{chapter}{References}
This means literally "add section References at the end of table of contents, and enumerate links (bibitem) as they follows in bibliography list". And that is where shoe pinches for LaTeX-beginners - in the text links will have been enumerated as they are in list of references but not in the order of citing.
\begin{thebibliography}{99}
\bibitem{catheydowskinewparadigm} W.T. Cathey and E.R. Dowski, ``New paradigm for imaging systems'', Appl. Opt. 41, pp. 6080-6092, 2002.
Besides that, where will be a big problems when you want to include part of bibliography items in another document. Which of them are useful, and in what order? To prevent such kind of problems, BiBTeX was invented.
Bibliography databases
This is a simple text file, where all you bibliography sources are listed. Such file can be used by LaTeX to produce bbl-file with only that literature sources, which were cited in document.
Every time you compiling you LaTeX document, BiBTeX searches citations in base and substitutes them into bbl-file. Obtained bbl-file is used as "thebibliography" list - but it created automatically.
Hence, you don't need to fight with bibliography in LaTeX - just add literature to you BiBTeX base using fancy GUI program. Created bibliography base can be used with many document, and benefits are:
Thus, you ought to make an effort to use BiBTeX - using you bib-base, it is possible to simply type \cite{source} and don't pay attention on which order cited literature appears in document. Simple and easy.
How it works
To start working with BiBTeX, it is necessary to install any program to work with BiBTeX, create new bib-base and full it with literature sources which you have. If you wrote early at the end of document:\addcontentsline{toc}{chapter}{Reference}
hence, now you must point to bib-base like that (don't write .bib extension!):
\begin{thebibliography}{99}\bibliography{path/to/bibliography/file}
and, apart from other, choose bibliography style which you want to use - often unsorted list is used (i.e., in order of mentioning in text):
e.g.,
\bibliography{biblio/my}\bibliographystyle{unsrt}
This string must be pasted in header of LaTeX document, after \usepackage but before \begin{document}.
Here we exploiting possibilities of our OS, which alleviates our life: use symlinks. For example, we have two documents in different directories, but they using the same bib-base. How can it be used in either documents? Easily:just make symbolic link to directory with bib-base file and copy this symlink in desirable directories. This can be done in any UNIX systems.
So, if we have bibliography base file my.bib placed in ~/docs/matlab/docus/topics/biblio/ we need to point in LaTeX document to it \bibliography{biblio/my} and make symlink on directory:ln -s ~/docs/matlab/docus/topics/biblio/ biblio
and copy symlink in desirable directories. That's all, you LaTeX documents will work with bib-base.
Installation
For described miracles to be working, installation of bibtex-viewer program is required. Let's use crossplatform software JabRef, Java-written and GPL-licensed.
Hence, we need to download from Internet j2re*.deb (for example, jpre1.4_1.4.2.03-1_i386.deb), jabref*_all.deb (I have jabref_2.0.1-1_all.deb) and take first DVD-disk with Debian.
Firstly, installing java-common :#apt-get install java-common
Then installing Java-machine (correct file name if you have another version of Java):#dpkg -i jpre1.4_1.4.2.03-1_i386.deb
Several questions may be asked during installation process, such as licence agreement. Then install JabRef - as separate package, if it isn't in distribution:#dpkg -i jabref_2.0.1-1_all.deb
That's it: now add JabRef to menu of you favourite window manager and run:jabref
Don't forget to correct your LaTeX documents and point LaTeX to use BibTeX base:\bibliography{path/to/bib-file/base}
and work as usual - citing literature and don't boring, BibTeX will do this job instead of us. At the end of document references will be typesetted by all rules.
A few advises
Fistly, don't forget to backup you bib-base. It can be exported in different formats or simply be copied in different disk
Second, many journals as SpringerLink or Elsavier brings Citations for published works. Don't miss them and collect this files - they are usually in RIS or BIB-formats. Download them and the import to JabRef base, give them bibkey names and you get proper citing of desirable article.
Read more...
![]()
![]()
![]()
![]()
![]()
![]()
![]()
Saturday, 15 December 2007
GPRS in Debian GNU/Linux with mobile phone Siemens ME45
Problem: connect to the Internet via mobile phone and GPRS using USB-adapter Prolific PL2303 under Linux.
Solve: there are enough tools in Debian to do so.
What we have
All above mentioned will have show in my notebook Asus M5200AE under Debian GNU/Linux and Siemens ME45, adapter and local Beeline cellphone provider.
Before starting
For work to be done, PPP in kernel is required:Networking options->
monolith or as module. Besides it, in kernel support of phone link adapter must be activated:
TCP/IP networking ->
Network device ->
PPP (point-to-point protocol) supportUSB support->
If this is done, plug phone link USB adapter into USB and look at logs:
Support for USB ->
USB Serial Converter support->
USB Serial Converter support
[m] USB Generic Serial Driver
[m] USB Prolific 2303 Single Port Serial Driverusb 3-1: new full speed USB device using uhci_hcd and address 3
That's all, adapter is found and recognized by kernel, new port /dev/ttyUSB0 which will be pointed to dial program.
drivers/usb/serial/usb-serial.c: USB Serial support registered for pl2303
pl2303 3-1:1.0: pl2303 converter detected
usb 3-1: pl2303 converter now attached to ttyUSB0
usbcore: registered new driver pl2303
drivers/usb/serial/pl2303.c: Prolific PL2303 USB to serial adaptor driver
Tune GPRS
Only thing to do is to point to dialer right parameters, and one can use GPRS without problems. Gaining root privileges and go to /etc/ppp/peers/ to create file beeline with following contents:/dev/ttyUSB0
Don't set too big speed of connection, it can be cause of connection breakage. One more file, beeline-connect, one ought to make in directory /etc/chatscripts/ and write in it:
57600
noauth
defaultroute
usepeerdns
persist
noipdefault
lock
connect '/usr/sbin/chat -v -f /etc/chatscripts/beeline-connect'
novjccomp
nopcomp
noaccomp
noipdefault
nodeflate
novjTIMEOUT 45
If you use different operator, change the line AT+CGDCONT=1,"IP","internet.beeline.ru" to that which is written on a website of you cellphone provider.
ABORT 'NO ANSWER'
ABORT 'BUSY'
ABORT 'NO CARRIER'
SAY 'Starting GPRS connection\n'
ABORT ERROR
"" 'ATZ'
"" 'ATE1'
OK AT+CGDCONT=1,"IP","internet.beeline.ru"
OK ATD*99***1#
CONNECT c
Connecting to the Internet via GPRS
All necessary tweaks are done and now one can use GPRS in Linux - let's enter the command from root:pppd call beeline
A few seconds of waiting and it is possible to work as usual:
or
pon beeline
To disconnect from the internet, type:killall pppd
That's all.
or
poff beeline
If something goes wrong...
Not everything can be done from first trying, and if GRPS doesn't work properly, you must look up in logs, and concretely - /var/log/syslog. This file in being red only root, so gaining root privileges and reading logs:
Aug 14 08:30:37 localhost chat[7715]: timeout set to 45 seconds
Aug 14 08:30:37 localhost chat[7715]: abort on (NO ANSWER)
Aug 14 08:30:37 localhost chat[7715]: abort on (BUSY)
Aug 14 08:30:37 localhost chat[7715]: abort on (NO CARRIER)
Aug 14 08:30:37 localhost chat[7715]: abort on (ERROR)
Aug 14 08:30:37 localhost chat[7715]: send (ATZ^M)
Aug 14 08:30:37 localhost chat[7715]: send (ATE1^M)
Aug 14 08:30:37 localhost chat[7715]: expect (OK)
Aug 14 08:30:37 localhost chat[7715]: g^?ATZ^MAT^M
Aug 14 08:30:37 localhost chat[7715]: OK
Aug 14 08:30:37 localhost chat[7715]: -- got it
Aug 14 08:30:37 localhost chat[7715]: send (AT+CGDCONT=1,"IP","internet.beeline.ru"^M)
Aug 14 08:30:38 localhost chat[7715]: expect (OK)
Aug 14 08:30:38 localhost chat[7715]: ^M
Aug 14 08:30:38 localhost chat[7715]: EAT+CGDCONT=1,"IP","internet.beeline.ru"^M^M
Aug 14 08:30:38 localhost chat[7715]: OK
Aug 14 08:30:38 localhost chat[7715]: -- got it
Aug 14 08:30:38 localhost chat[7715]: send (ATD*99***1#^M)
Aug 14 08:30:38 localhost chat[7715]: expect (CONNECT)
Aug 14 08:30:38 localhost chat[7715]: ^M
Aug 14 08:30:38 localhost chat[7715]: ATD*99***1#^M^M
Aug 14 08:30:38 localhost chat[7715]: CONNECT
Aug 14 08:30:38 localhost chat[7715]: -- got it
Aug 14 08:30:38 localhost chat[7715]: send (c^M)
Aug 14 08:30:38 localhost pppd[7314]: Serial connection established.
Aug 14 08:30:38 localhost pppd[7314]: Using interface ppp0
Aug 14 08:30:38 localhost pppd[7314]: Connect: ppp0 <--> /dev/ttyUSB0
Aug 14 08:30:41 localhost pppd[7314]: PAP authentication succeeded
Aug 14 08:30:44 localhost pppd[7314]: Cannot determine ethernet address for proxy ARP
Aug 14 08:30:44 localhost pppd[7314]: local IP address 10.0.103.11
Aug 14 08:30:44 localhost pppd[7314]: remote IP address 192.168.254.254
Aug 14 08:30:44 localhost pppd[7314]: primary DNS address 217.118.66.243
Aug 14 08:30:44 localhost pppd[7314]: secondary DNS address 217.118.66.244
After that strings I gained network interface ppp0
notebeast:/home/beast# ifconfig
lo Link encap:Local Loopback
inet addr:127.0.0.1 Mask:255.0.0.0
UP LOOPBACK RUNNING MTU:16436 Metric:1
RX packets:84 errors:0 dropped:0 overruns:0 frame:0
TX packets:84 errors:0 dropped:0 overruns:0 carrier:0
collisions:0 txqueuelen:0
RX bytes:5483 (5.3 KiB) TX bytes:5483 (5.3 KiB)
ppp0 Link encap:Point-to-Point Protocol
inet addr:10.1.193.83 P-t-P:192.168.254.254 Mask:255.255.255.255
UP POINTOPOINT RUNNING NOARP MULTICAST MTU:1500 Metric:1
RX packets:204 errors:0 dropped:0 overruns:0 frame:0
TX packets:273 errors:0 dropped:0 overruns:0 carrier:0
collisions:0 txqueuelen:3
RX bytes:109516 (106.9 KiB) TX bytes:27628 (26.9 KiB)
through which Internet is being shed like a broad river.
Read more...
![]()
![]()
![]()
![]()
![]()
![]()
![]()
Friday, 7 December 2007
How to change MAC-address of Ethernet card
Temporary MAC-address change
Go to the terminal and type:
sudo ifconfig eth0 hw ether xx:xx:Xx:xxand MAC-address change and will stay until reboot. If you wish to change MAC-address permanently, you need to do this:
Permanent change of MAC-address
In Debian, for example, go to /etc/network/if-pre-up.d/ and create file from root named pre-up.
Let`s write to them strings like this:
#! /bin/shChange zeroes by needed MAC-address. To make changes active immediately, restart of network subsystem is required:ifconfig eth0 hw ether 00:00:00:00
/etc/init.d/networking restartIn first time, following diagnostic messages are expected to appear:
# /etc/init.d/networking restartNo problems, repeat command, and it will execute smoother:
Setting up IP spoofing protection: rp_filter.
Reconfiguring network interfaces...SIOCDELRT: No such process
ifup: interface lo already configured
SIOCSIFHWADDR: Device or resource busy
run-parts: /etc/network/if-pre-up.d/pre-up exited with return code 1
done.
notebeast:/home/beast# /etc/init.d/networking restartHere we go, the MAC-address is changed permanently.
Setting up IP spoofing protection: rp_filter.
Reconfiguring network interfaces...ifup: interface lo already configured
done.
How to find out MAC-address of network card in Linux
It's very simple, just type:
sudo ifconfigand you see something like this:
eth0 Link encap:Ethernet HWaddr 00:0A:E4:53:AA:2DOne's MAC-address is emphased by red font colour.
inet addr:10.26.49.77 Bcast:10.26.63.255 Mask:255.255.240.0
UP BROADCAST RUNNING MULTICAST MTU:1500 Metric:1
RX packets:208554 errors:0 dropped:0 overruns:0 frame:0
TX packets:125071 errors:0 dropped:0 overruns:0 carrier:0
collisions:0 txqueuelen:1000
RX bytes:40664531 (38.7 MiB) TX bytes:45919980 (43.7 MiB)
Interrupt:21 Base address:0x4c00
lo Link encap:Local Loopback
inet addr:127.0.0.1 Mask:255.0.0.0
UP LOOPBACK RUNNING MTU:16436 Metric:1
RX packets:18511 errors:0 dropped:0 overruns:0 frame:0
TX packets:18511 errors:0 dropped:0 overruns:0 carrier:0
collisions:0 txqueuelen:0
RX bytes:537155 (524.5 KiB) TX bytes:537155 (524.5 KiB)
Yet another tips to change MAC-address
For example, MAC-address in Gentoo can be changed in /etc/conf.d/net
mac_eth0="00:50:8D:63:41:DE"
config_eth0=( "192.168.100.37 netmask 255.255.252.0" )
routes_eth0=(
"default via 192.168.100.1"
)
- Or edit /etc/network/interfaces adding one string:
- Indeed, there are loads of variants, because it is Linux :-)
iface eth0 inet static
address 192.168.1.1
netmask 255.255.255.0
hwaddress ether xxxxxxxxxxxx
Conclusion
This post can be useful to those who connected to Internet via provider authorising by MAC-address.
Read more...
![]()
![]()
![]()
![]()
![]()
![]()
![]()
Thursday, 6 December 2007
Yet another Linux to Windows printing tip
Problem: one have a printer shared for networks printing and connected to a windows machine. From the other side, there is Linux-powered machine with CUPS installed and we want to print on windows shared printer.
Solve: with CUPS webform, adding printer and specifying login guest for printing without a password in a windowish printer.
Let's consider a common situation: we have winXP computer with network address 192.168.1.1, it has network shared printer LaserJet 1200 visible by SAMBA with name HPLaserJ. From another windows machines all printed without problems, but from Linux machine with CUPS when you attempt to print something you getting error.Connection failed with error NT_STATUS_ACCESS_DENIED
If you attempt to print on it via IPP, you get:
Unable to connect to SAMBA host, will retry in 60 seconds...foomatic-rip version $Revision$ running...
There is no password on shared printer in windows - it is empty.
Solve of this puzzle is ridiculously simple. Just add in CUPS webform new printer, choose "Windows printer via Samba", and in address field write:smb://guest@192.168.1.1/HPLaserJ
And that's all! Printing without a problems!
It's incredible that in huge and pretty goofy CUPS documentation this useful example is missing.
In KDE applications you ought to choose local printing address 127.0.0.1:631.
Read more...
![]()
![]()
![]()
![]()
![]()
![]()
![]()
Saturday, 24 November 2007
How to configure webcam in Debian Linux
The friend of mine had been presented to me a webcam recently. On the box of Logitech QuickCam, there were logo of an alternative operation system, but in Debian configuration of a webcam is as easy as 1-2-3. Here are tips for configuration of a webcam.
Preparation
Some preparing words - if you didn`t compile your own kernel, this section can be omitted.
Webcam interface in kernel is almost like TVtuner - it is ordinary video device with /dev/video0 output. That`s why all articles about TVtuner configuration can help you as well. So, in kernel must be turned on:
If it is enabled in kernel, you shouldn`t get any problems.
Installation
In the camera`s box was wrote: installation as simple as 1-2-3. So, I get pretty the same:
1. Installing software.
Instead of use of tonnes of proprietary garbage, let`s install from Debian repository:sudo aptitude install gspca-source camorama
In the /usr/src directory, archive with driver source gspca-source.tar.bz2 will appear. Unpack it and change directory to /usr/src/modules/gspca and execute following:make
Module must compile without errors. Next, do this:sudo make install
This command will install your module in directory, were other kernel modules are placed. Optionally it can be executed:sudo depmode -a
That`s itl, our goal is to load module of a webcam:sudo modprobe gspca
Next step is to plug camera in USB and start the software.
2. Plugging the webcam
After you plug webcam into USB, it turns on green LED and in kernel logs should appear something like this:
usb 4-1: new full speed USB device using uhci_hcd and address 6
usb 4-1: configuration #1 chosen from 1 choice
/usr/src/modules/gspca/gspca_core.c: USB SPCA5XX camera found.(ZC3XX)
/usr/src/modules/gspca/gspca_core.c: [spca5xx_probe:3887] Camera type JPEG
/usr/src/modules/gspca/Vimicro/zc3xx.h: [zc3xx_config:515] Sensor ID:7
/usr/src/modules/gspca/Vimicro/zc3xx.h: [zc3xx_config:597] Find Sensor HV7131R(c)
/usr/src/modules/gspca/gspca_core.c: [spca5xx_getcapability:1165] maxw 640 maxh 480 minw 176 minh 144
usbcore: registered new interface driver gspca
/usr/src/modules/gspca/gspca_core.c: gspca driver 01.00.04 registered
It looks like the webcam had been recognised. Now the device file /dev/video0 must appear - this is actually our camera. After that, webcam's soft should be launched:$ camorama
If all was done correctly, you should see video in a small window of Camorama. It can be something like this:
3. Start using the camera
Now you can use your cam in Wengophone for video conference with friends and colleagues. It is need to say that image processing from webcam consumes processor time very moderate, around 4-5% on my Pentium M 1.75 GHz laptop.
Besides video conferences in VoIP, one can turn fantasy on and find many interesting applications to webcam. You may use it as security camera or telemetric device: streamer program can grab pictures from it with a prescribed frequency.
Conclusion
Except that there were mentioned only RedmondOS, Logitech QuickCam Messanger webcam works great in Linux, and configured in same three steps minus tons of useless proprietaty garbage.
During the tweaking I used these great guidelines because of my custom-made kernel. Those who use distribution kernel, this guide may be helpful.
I am very grateful to my good old friend :-) for presented webcam - thanks a lot!
Read more...
![]()
![]()
![]()
![]()
![]()
![]()
![]()
Saturday, 17 November 2007
Yakuake - terminal in a Quake-style
When you use console in X-Window, often and often you desktop are literally wasted with xterms. It is more important, that you productivity is lowered, too. But here is solution - Yakuake.
Gamer`s console
When I was young, I spent pretty much time with CounterStrike and QuakeIII. And I felled in love with this small and elegant console hidden-in-a-top of screen in Quake. Till now, I was missing this feature on my desktop. But surfing in Synaptic recently, I found what I missed so much - Yakuake - and installed it immediately.
Tweaking is necessary
The main thing after installing Yakuake is tweaking. For comfort and productive work, you should customise Yakuake to yourself: keyboard shortcuts, theme, console hide duration and so on.
First step is to define for yourself with size of console: if it`s too small, you can`t see all that is written in console, and if it`s too large, it can overlap all of applications. I think that vertical size of 40% is fine for me - I can see everything in console and it don`t occludes other applications.
You can customize not only height of Yakuake console, but position on screen as well. It can be positioned in left, right on in centre. Of course, you can set position in procents precisely.
But the main thing in Yakuake are hotkeys. The work in console itself disposes to hotkeys and keyboard use, and properly configured hotkeys combinations can increase you productivity with Yakuake dramatically. There are not so much keys to customise, so tweaking don`t take so much time. By default you can call Yakuake by pressing F12 functional key, but you can redefine it to you choice.
Because Yakuake is very dynamic thing, only video can show it real capabilities, so I made short youtube film and here it is:
A little comment: first of all, film shows conventional work in terminal with xterms in X-Window, and they overlap each other. Then Yakuake is ran, and do the same stuff much more effective.
Links:
More about Yakuake can be readed here, there and here.
Read more...
![]()
![]()
![]()
![]()
![]()
![]()
![]()
Wednesday, 14 November 2007
Quick PDF sorting and searching: SWISH++
Problem: using SWISH++ it is possible to search and sort PDF-files automatically
Solve: tools like pdftotext, find, scripts on Bash or Perl are required to perform quick and fast search within PDF and indexing PDF documents.
The common way is to use Beagle or some other searching stuff, but I show how SWISH++ can do the same, but much, much more fast and resource-efficient.
Introduction: How indexing within PDF
Perl-lovers likes to say that "there is more than one way to do it". So, that`s my way to do it. Briefly, solve consists from these steps:
Searching in PDF-documents and getting text from them
Simply asking find tool to search all *.pdf files and for everyone executing pdftotext in quiet mode. This can be achieved by command:find -name '*.pdf' -exec pdftotext -nopgbrk -q {} \;
It is possible only for English, and other languages are not supported..
Making index file
Here it is even more simply: just ask index++ to index all of our textual files from current directory to the deep:index++ -e "text:*.txt" .
Dot at the end is required!
What is SWISH++
There are a few mentions about SWISH++ in the Net - only homepage of project and article about application this system to real search engine. Some guys tells that SWISH++ is fastest search engine ever.
Description of this excellent search system can be found in debian package - Simple Document Indexing System for Humans: C++ version. Especially it is suitable for fast and efficient search engine.
Here are some advantages of SWISH++
SWISH++ consist of two tools: index++ и search++. First tool indexing files, and second one searches within index. It`s like your personal Google, but small, fast and console. :-)
Indexing files
index++ make index file, which contains indexed text documents, made by pdftotext (oh, yea, UNIX-way!). It supports such formats as text, HTML, XML, LaTeX, mail - all that can be converted to text with may be little bit of tag-reached. On my desktop machine indexing is very fast: Intel Р4 630 3GHz with 2GB RAM indexing 270 in 5 seconds.
With level verbosity of 3, one can get more information about indexing process:index++ -v3 -e "text:*.txt" .
Dot at the end is important, manual page can say more. Output will be like this: watters_etal_paleobio_2001.txt (2704 words) WaveMetriconChip64.txt (1351 words) wshedtopoalgoJMIV.txt (4042 words) Ye.IJDAR.1.txt (4470 words) YucelITIP01.txt (1678 words) ./edg: morphology.txt (753 words) LuengoEtAl_IbPRIA05.txt (1227 words) Cuisenaire2005_1250.txt (1162 words) icpr2004_nucleus.txt (1234 words) OrtizEtAl_SPIE01.txt (1463 words) Angulo_VIIP04.txt (1658 words) 682.txt (1901 words) comorph.txt (1948 words) index++: ranking index... index++: writing index... index++: done: 00:05 (min:sec) elapsed time 548 files, 271 indexed 2465116 words, 1046139 indexed, 56281 unique
The result will be swish++.index file were are all information about indexed files.
Great: this huge collection of articles indexed so fast! Now we are ready to search something in it.
Searching files
Let`s find something in our collection of files with keywords. It is possible by asking search++ to find in database swish++.index. For example, I can search papers about morphology analysis of images but without mentions about medicine:$ search++ morphology and erosion and dilation not medicine
And here are results (output is reduced):# results: 125
First column is relevantness, second - relative file placement, third - file size, and fourth - name. Simple and clean. So it`s very simple to search article if you remember something about it (author name, keywords, or even phare from it).
99 ./Krylov2.txt 3771 Krylov2.txt
49 ./13300407.txt 3103 13300407.txt
46 ./morph1.slides.printing.6.txt 4369 morph1.slides.printing.6.txt
37 ./lecture_morphology_sara.txt 6746 lecture_morphology_sara.txt
30 ./SIGGRAPH2002_Sketch-Mitchell.txt 5308 SIGGRAPH2002_Sketch-Mitchell.txt
26 ./MorphologicalImageProcessing.txt 7642 MorphologicalImageProcessing.txt
25 ./phdsymp2002_ledda.txt 8298 phdsymp2002_ledda.txt
23 ./lab2_manual.txt 9313 lab2_manual.txt
23 ./Project 1.txt 9946 Project 1.txt
22 ./morphology.txt 11212 morphology.txt
22 ./edg/morphology.txt 11212 morphology.txt
22 ./slides-6-geometry.txt 11717 slides-6-geometry.txt
22 ./V1BFOGG8.txt 10797 V1BFOGG8.txt
18 ./71650638.txt 13978 71650638.txt
What we get
I have vast collection of science articles in English, and it`s very hard to remember exact name and content each of paper. Using this approach, I had sorted more than 2400 papers in about 2 hours. Task for SWISH++ was more difficult because of homogeneity of paper`s content. Precision was estimated as approximately 60-70%. Of course, sorted papers had been viewed by me, so it was semi-automatic-alike mode ;-)
Links: I can`t say all about this shiny search system in one post, but I tried to show how quickly and easily I working with loads of PDFed articles in my Debian box.
For further information, you may be interest in sourceforge page of project. Here are many articles aobut search engines, and, particularly, about SWISH++, and documentation about SWISH-e is here. I hope that with this post, there will be one more article about this very useful system - SWISH++.
Read more...
![]()
![]()
![]()
![]()
![]()
![]()
![]()
Saturday, 3 November 2007
XMMS: Just play music
There is an interesting class of programs: audioplayers. What we expected from them? Playing music. What is required for this? Codecs, simple interface, playlist, equalizer. May be themes and control from keyboard. Many things can be applied to it, but audioplayer must stay a-music-player. This is primary task for such kind of program, and afterwards - cataloguer, tag converter, music collection organizer and so on. For this, spartanians and ancient-lovers remembers and likes simple yet powerful XMMS.
There is many a good tune played on an old fiddle...
This strings are being written in hope that there are still stayed people, who needs the only music playing from audioplayer. Without bells and whistles, and without dependencies from half of KDE and quarter of GNOME. And there is a honest hero, in an old GTKish arms, which is in Debian distribution from old times - xmms. Fast, simple, without bells and whistles, all necessary features and with support of all common formats. Here it is on a screenshot:
It`s strongly WinAmp-alike, which had been used by anybody in some less-knows operation system from Redmond. Without loads of pretties, but with themes (which there are enormous in Debian distribution), equalizer and playlist. If you don`t look you you audioplayer permanently, there is no more needed. XMMS is configured by menu, which is very WinAmp-like:
Many features can be configured here... Audio output method, codecs, startup behaviour, fonts...
After that, music can be copied into directory, and tags can be converted by another software, such as EasyTag. I like XMMS for incredibly speed of loading songs with tags: more than 400 music files are loaded with less than 6 seconds with alphabet sorting. And I`m don`t remember about it anymore - XMMS is minimized to tray and controlled by multimedia keyboard.
Plugins
Searching in repository with combination# apt-cache search xmms-
gives pabulum for reflection:xmms - Versatile X audio player that looks like Winamp
xmms-festalon - XMMS Input plugin for playing NSF music files
xmms-liveice - XMMS plugin that sends your audio to a shoutcast server
xmms-alarm - xmms general plugin for using xmms as an alarm clock.
xmms-arts - aRts Output plugin for xmms
xmms-blursk - Powerful visualization plugin for XMMS, similar to "Blur Scope"
xmms-bumpscope - visualization plugin for XMMS that appears as an embossing oscilloscope
xmms-cdread - Input plugin for XMMS that reads audio data from CDs
xmms-crossfade - XMMS Plugin for Crossfading / Continuous Output
xmms-dbmix - XMMS output interface to the DBMix audio system
xmms-defx - A Sound alterator plug-in for xmms
xmms-dev - XMMS development static library and header files
xmms-finespectrum - XMMS Fine Spectrum Analyzer Plugin
xmms-flac - Free Lossless Audio Codec - XMMS input plugin
xmms-fmradio - FM Radio input plugin for XMMS
xmms-goodnight - XMMS plugin to stop playing at a given time
xmms-goom - visualization plug-in for XMMS with a variety of effects
xmms-infinity - full-screen visualisation effect for XMMS
xmms-infopipe - General plugin for XMMS, reports real-time information to a pipe
xmms-iris - advanced OpenGL visualization plugin for XMMS
xmms-jack - xmms output plugin to the jack audio server
xmms-jess - visualization plugin for XMMS using various 2D and 3D methods
xmms-kjofol - XMMS remote that uses K-Jofol's skins
xmms-kjofol-skins - Skins for the xmms-kjofol package
xmms-ladspa - power XMMS with the Linux Audio Developer's Simple Plugin API
xmms-lirc - Linux Infrared Remote Control for XMMS
xmms-mad - mp3 input plugin for xmms based on libmad
xmms-modplug - ModPlug plugin for XMMS
xmms-msa - spectrum analyzer plugin for XMMS with skin support
xmms-osd-plugin - XMMS plugin using xosd
xmms-qbble - XMMS playlist manager with search support
xmms-rplay - RPlay Output Plugin for XMMS
xmms-shell - XMMS Shell - Interface to control XMMS from the Console
xmms-sid - Input plugin for XMMS that plays SID (C64) tunes
xmms-singit - Display and edit lyrics with XMMS
xmms-skins - Skins for XMMS
xmms-stats - Make stats of your preferred songs
xmms-status-plugin - Status panel applet for XMMS
xmms-synaesthesia - visualization plugin for XMMS with a field of glowing lights
xmms-volnorm - XMMS plugin that gives all songs the same volume level
xmms-xf86audio - XF86Audio multimedia-key support for XMMS
xmms-coverviewer - XMMS plugin that displays covers while playing
xmms-find - XMMS plugin for quick, remote jump to another song
xmms-jackasyn - JACK Output plugin for xmms
xmms-kde - MP3 player integrated into the KDE panel
xmms-mpg123-ja - mpeg123 plugin supported Japanese encodings for xmms
So, that`s why XMMS is versatile. There is no need to install all plugins, but some of them are payed attention:
There are more plugins - xmms can be tweaked for your comfort simply.
...but that`s fiddle can`t play hardrock
Of course, XMMS have contras - there no silver bullet. GTK1 menus are so ugly, that Compiz\Beril-lovers can harm their gentle psychology.
But, as mentioned earlier, you wanted simple yet powerful player? Here it is! And it`s better than looking at Ubuntu dialog box "for music playing, loads of codecs are required". And here it`s playing and singing.
Conclusion
This post was inspired by questions on forums. And dear commentators, don`t throw addle vegetables in me: I really like XMMS, like MC.
Read more...
![]()
![]()
![]()
![]()
![]()
![]()
![]()


